The 10 JavaScript Console Methods Beyond console.log That Save Hours of Debugging in 2026
📧 Subscribe to JavaScript Insights
Get the latest JavaScript tutorials, career tips, and industry insights delivered to your inbox weekly.
Every JavaScript developer knows console.log. It is the first debugging tool you learn and, for most developers, the last one you ever use. I watched a senior developer last month debug a performance issue by adding 47 console.log statements across 12 files, scrolling through hundreds of lines of terminal output, trying to find the one log that showed where the bottleneck was. It took him 3 hours. The same problem could have been solved in 10 minutes with console.time and console.table.
The JavaScript console object has over 20 methods. Most developers use exactly one of them. This is like owning a toolbox with 20 specialized tools and using only the hammer for every single job, including the jobs that clearly need a screwdriver, a wrench, or a measuring tape. The hammer works for nails but it is terrible for screws, and right now most developers are hammering screws into walls and wondering why their debugging sessions take so long.
I run jsgurujobs.com and talk to JavaScript developers daily. When I ask about debugging techniques in conversations, 90% of developers mention console.log as their primary tool. Maybe 10% mention the browser DevTools debugger. Almost nobody mentions console.table, console.group, console.trace, or console.time. These methods exist specifically to solve the problems that developers try to brute-force with console.log, and they solve them faster, with less noise, and with output that is actually readable.
This article covers the 10 console methods that will fundamentally change how you debug JavaScript. Not theoretical methods that sound interesting but you will never actually use in a real project. The practical methods that solve real debugging problems that developers encounter daily in React applications, Node.js APIs, Express middleware, Next.js server components, and production monitoring in 2026.
Why JavaScript Debugging Skills Matter More in 2026 Than Ever Before
AI generates code faster than developers can understand it. Cursor, Copilot, and Claude Code produce hundreds of lines per session. When that code breaks, and it always eventually breaks, you need to debug code you did not write and may not fully understand. The function names are unfamiliar. The logic is structured differently than how you would have written it. The variable names might be generic because AI tends to default to names like data, result, and temp. Throwing console.log everywhere in AI-generated code is slow because the code is unfamiliar, you do not know which part is likely broken, and you do not know where to start looking.
The developers who debug fastest in 2026 are not the ones who read code fastest. They are the ones who use the right diagnostic tools to narrow down the problem without reading every line. Console methods are those diagnostic tools.
On jsgurujobs.com, "debugging skills" and "troubleshooting" appear in 28% of senior role descriptions. Companies have learned that the developer who can find and fix a production bug in 20 minutes saves more money than the developer who writes code 20% faster. Speed of debugging is speed of shipping, because every minute spent on a bug is a minute not spent on features.
For developers who want to understand how systematic debugging separates senior developers from everyone else, mastering console methods is the foundation. You cannot be systematic if your only tool is console.log and prayer.
console.table for Debugging Arrays and Objects Without Squinting at JSON
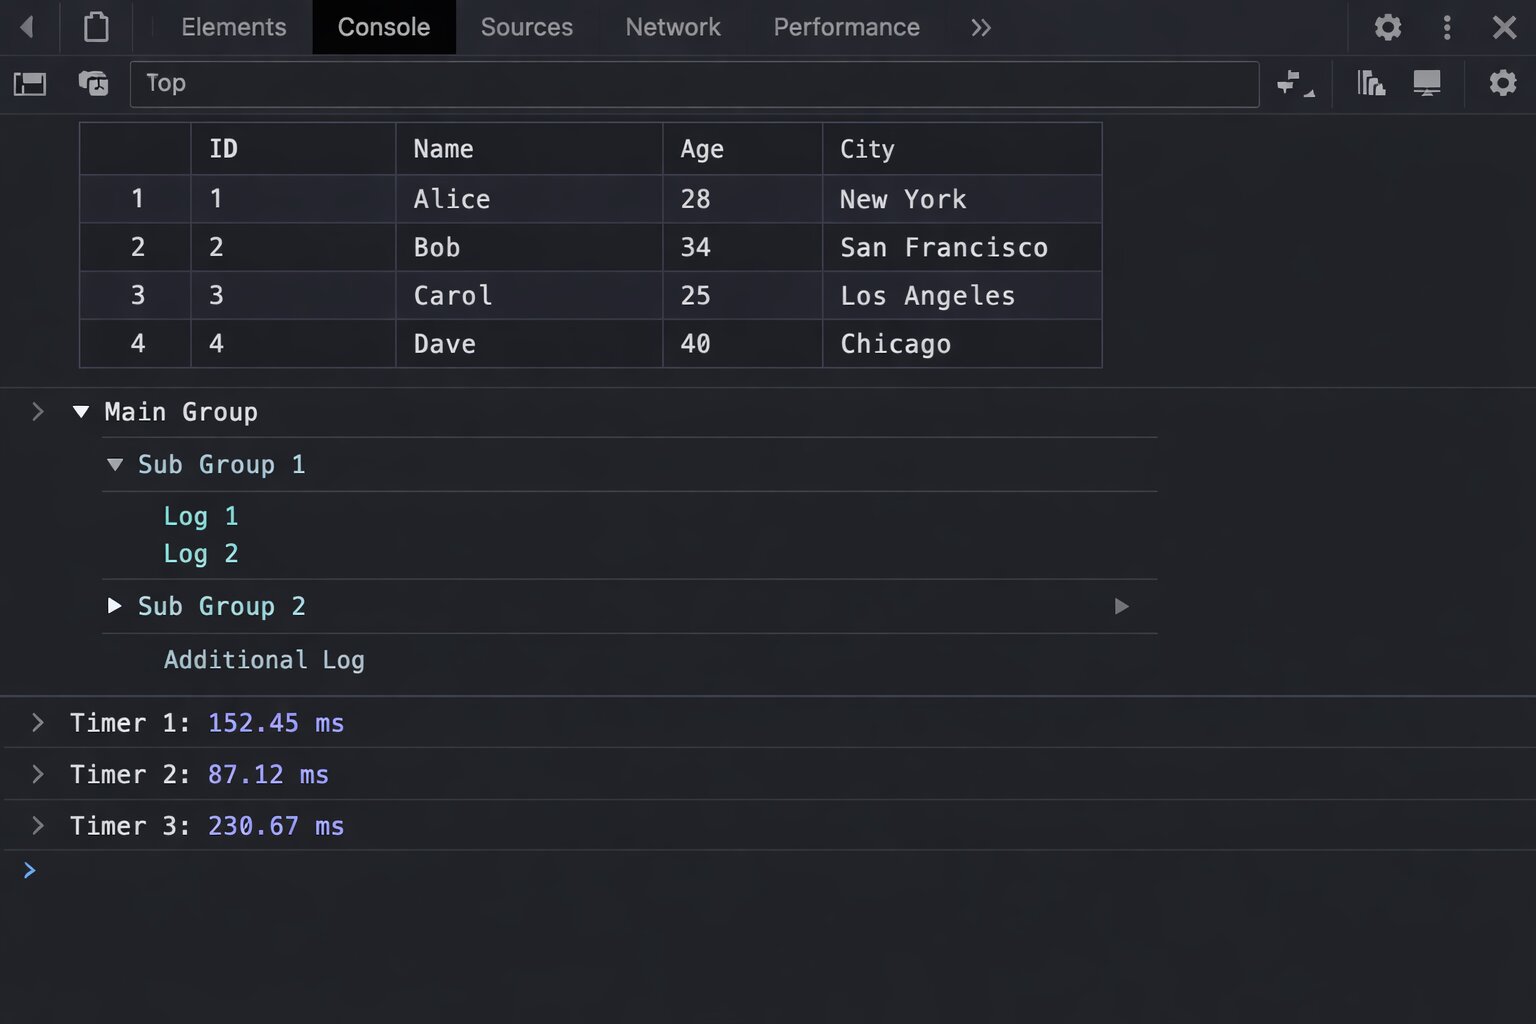
console.table is the single most underused console method. It takes an array of objects and displays it as a formatted table with sortable columns. Instead of scrolling through collapsed objects in the console, you see your data in a grid that your brain can actually process.
// What most developers do
const users = await fetchUsers();
console.log(users);
// Output: [{...}, {...}, {...}, {...}, {...}] - collapsed, unreadable

// What you should do instead
console.table(users);
// Output: a beautiful table with columns for each property
The table output shows each object as a row with columns for every property. You can click column headers to sort. You can see at a glance which users are active, which have admin roles, and which have null values where they should not.
Selecting Specific Columns
When objects have 20 properties and you only care about 3, pass a second argument with the column names you want.
const users = await fetchUsers();
console.table(users, ['name', 'email', 'role']);
// Shows only name, email, and role columns
This is especially powerful when debugging API responses where each object has dozens of fields but you only need to verify that names and emails are correct.
Using console.table With Maps and Sets
console.table works with Maps and Sets too, not just arrays.
const userRoles = new Map([
    ['alice', 'admin'],
    ['bob', 'editor'],
    ['charlie', 'viewer'],
]);
console.table(userRoles);
// Shows Key and Value columns
The next time you are debugging a React component and need to check the state of an array of objects, use console.table instead of console.log. The difference in readability is immediate and dramatic. Instead of clicking through collapsed objects one at a time, you see all the data at once in a format your brain can actually scan for patterns and anomalies.
I use console.table at least 10 times a day when working on jsgurujobs.com. Checking which job postings have null salary fields, verifying that user data has the correct roles assigned, debugging pagination responses where the wrong page of results comes back. Every one of these is a visual scanning task that console.table handles in seconds and console.log handles in minutes of clicking and expanding.
console.group and console.groupEnd for Organizing Related Logs
When debugging a complex function that calls multiple sub-functions, console.log produces a flat list of output where everything blends together into an unreadable wall of text. You cannot tell which logs came from which function. You cannot tell which logs belong to the same execution flow versus a different request that happened to fire at the same time. console.group creates collapsible, nested groups that organize your output by context and make it possible to focus on one execution flow at a time.
function processOrder(order) {
    console.group(`Processing Order #${order.id}`);

    console.log('Validating items...');
    validateItems(order.items);

    console.log('Calculating total...');
    const total = calculateTotal(order);
    console.log(`Total: $${total}`);

    console.log('Processing payment...');
    processPayment(order, total);

    console.groupEnd();
}

function validateItems(items) {
    console.group('Item Validation');
    items.forEach(item => {
        console.log(`${item.name}: ${item.quantity} x $${item.price}`);
    });
    console.groupEnd();
}
The output is nested and collapsible. "Processing Order #42" is a collapsible group that you can click to expand or collapse. Inside it, "Item Validation" is another collapsible group. You can expand and collapse sections to focus on exactly the part of the flow you care about. Compare this to 15 flat console.log lines where order processing logs are mixed together with item validation logs and payment processing logs with no visual separation, no hierarchy, and no way to hide the parts you do not care about while focusing on the part that matters.
console.groupCollapsed for Verbose Debugging
console.groupCollapsed works exactly like console.group but starts collapsed. Use it for sections that you usually do not need to see but want available when something goes wrong.
function fetchData(url) {
    console.groupCollapsed(`Fetching: ${url}`);
    console.log('Headers:', headers);
    console.log('Params:', params);
    console.log('Timeout:', timeout);
    console.groupEnd();
}
The fetch details are hidden by default but one click expands them when you need to debug a failing request. This keeps your console clean during normal operation while preserving detailed debugging information for when you need it.
console.time and console.timeEnd for Measuring Performance Without External Tools
console.time starts a timer. console.timeEnd stops it and prints the elapsed time in milliseconds. This is the fastest way to measure how long something takes without setting up performance profiling tools.
console.time('database-query');
const users = await db.users.findMany({ where: { active: true } });
console.timeEnd('database-query');
// Output: database-query: 142.5ms

console.time('data-transform');
const transformed = users.map(transformUser);
console.timeEnd('data-transform');
// Output: data-transform: 3.2ms

console.time('api-response');
res.json(transformed);
console.timeEnd('api-response');
// Output: api-response: 1.1ms
Now you know instantly that the database query takes 142ms, the transformation takes 3ms, and the serialization takes 1ms. The bottleneck is obviously the database query, and you did not need to set up any profiling tools, install any packages, or configure any monitoring dashboards to figure this out. Without console.time, the developer in the story from the opening paragraph had to add timestamps manually using Date.now(), calculate differences between them, format the output himself, and still got the wrong answer twice before finding the real bottleneck because he accidentally put the end timestamp in the wrong place.
console.timeLog for Intermediate Measurements
console.timeLog prints the current elapsed time without stopping the timer. Use it to measure intermediate steps in a long process.
console.time('full-pipeline');

await fetchRawData();
console.timeLog('full-pipeline', 'after fetch');

await transformData();
console.timeLog('full-pipeline', 'after transform');

await saveResults();
console.timeEnd('full-pipeline');

// Output:
// full-pipeline: 203ms after fetch
// full-pipeline: 211ms after transform
// full-pipeline: 289ms
One timer, three measurement points. You can see that fetching takes 203ms, transforming takes 8ms (211 - 203), and saving takes 78ms (289 - 211). This is the production debugging pattern I use most often when investigating slow API endpoints on jsgurujobs.
console.trace for Finding Where a Function Was Called From
When the same function is called from 5 different places in your codebase and you need to know which specific call path triggered a specific behavior or produced a specific result, console.trace prints the complete call stack at the exact point where it is called. This is the method that answers the question every developer asks at least once a day: "where is this function being called from?"
function updateUserBalance(userId, amount) {
    console.trace(`Updating balance for user ${userId} by ${amount}`);
    // ... update logic
}
The output shows the full stack trace: updateUserBalance was called from processRefund, which was called from handleWebhook, which was called from stripeRouter. Now you know the exact path that triggered this balance update. With console.log, you would only know that the function was called but not by whom.
This is especially valuable in React applications where a state update triggers unexpected re-renders. Place console.trace inside the component that re-renders unexpectedly and you instantly see which parent component or hook triggered the re-render.
function ExpensiveComponent({ data }) {
    console.trace('ExpensiveComponent rendered');
    // ... expensive rendering logic
}
For developers who struggle with understanding the JavaScript event loop and debugging asynchronous code, console.trace shows the synchronous call stack that led to the current execution point. It does not show async boundaries (for that you need async stack traces in DevTools), but it catches the majority of "who called this function?" questions.
console.assert for Catching Incorrect Assumptions Without If Statements
console.assert prints an error message only when a condition is false. It does nothing when the condition is true. Use it to verify assumptions without adding if statements that clutter your code.
function withdraw(account, amount) {
    console.assert(amount > 0, 'Withdrawal amount must be positive', { amount });
    console.assert(account.balance >= amount, 'Insufficient funds', {
        balance: account.balance,
        amount,
    });

    account.balance -= amount;
    return account;
}
If amount is 50 and account.balance is 100, nothing prints. The assertions pass silently and invisibly. If amount is -10, you immediately see: "Assertion failed: Withdrawal amount must be positive {amount: -10}". The output includes the exact values that caused the failure, which is precisely the information you need to diagnose the problem without adding additional logging. If balance is 30 and amount is 50, you see: "Assertion failed: Insufficient funds {balance: 30, amount: 50}". The error tells you what went wrong and gives you the data to understand why.
Use console.assert liberally during development to catch edge cases early. Unlike actual runtime assertions that throw errors, console.assert only logs to the console and does not stop execution. This makes it safe to leave in code during development without worrying about it crashing the application.
// Sprinkle assertions in React components during development
function ProductCard({ product }) {
    console.assert(product.price >= 0, 'Negative price detected', product);
    console.assert(product.name.length > 0, 'Empty product name', product);
    console.assert(product.images.length > 0, 'Product has no images', product);

    return (
        <div className="product-card">
            <h3>{product.name}</h3>
            <p>${product.price}</p>
        </div>
    );
}
During normal operation, these assertions are invisible. When bad data slips through, they instantly flag exactly which assumption was violated and with which data. No need to add and remove if statements and console.log calls while debugging.
console.dir for Inspecting DOM Elements and Deep Objects
console.log on a DOM element shows the HTML representation. console.dir shows the JavaScript object representation with all properties, methods, event listeners, and internal state.
const button = document.querySelector('#submit-btn');
console.log(button);   // Shows: <button id="submit-btn">Submit</button>
console.dir(button);   // Shows: button object with onclick, classList, dataset, style...
When you need to check if an event listener is attached, what CSS classes are applied, or what data attributes exist, console.dir gives you the full picture. console.log gives you the HTML, which hides all of that.
Deep Object Inspection in Node.js
In Node.js, console.log truncates deeply nested objects with [Object] after a certain depth. console.dir with the depth option lets you see the full structure.
// Node.js
const deepObject = {
    level1: {
        level2: {
            level3: {
                level4: {
                    value: 'found it',
                },
            },
        },
    },
};

console.log(deepObject);
// Output: { level1: { level2: { level3: [Object] } } }

console.dir(deepObject, { depth: null });
// Output: shows the complete nested structure including level4
The { depth: null } option tells Node.js to expand the entire object regardless of nesting depth. This is essential when debugging complex API responses or database query results where the data you need is nested 4-5 levels deep.
console.count and console.countReset for Tracking How Many Times Something Happens
console.count increments and prints a counter each time it is called. Use it to answer the question "how many times does this code execute?" without adding manual counter variables.
function renderItem(item) {
    console.count('renderItem calls');
    // ... render logic
}

// Output after rendering a list of 15 items:
// renderItem calls: 1
// renderItem calls: 2
// ...
// renderItem calls: 15
This is invaluable for debugging React re-render issues. If renderItem is called 45 times when you only have 15 items, you know something is triggering unnecessary re-renders. Maybe a parent component re-renders and forces all children to re-render. Maybe a context value changes on every render. Maybe a prop is a new object reference on every render even though its content has not changed. console.count does not tell you why the re-renders happen, but it tells you they are happening, which is the critical first step. From there you use console.trace to find the cause.
In a real debugging session last week on jsgurujobs.com, I used console.count inside a job card component and discovered it was rendering 3 times per job instead of once. The cause was a parent component updating a context value on mount, then again on data fetch, then again on filter initialization. Three renders times 50 jobs equals 150 renders instead of 50. The fix took 5 minutes once I knew the problem existed. Finding the problem took 30 seconds with console.count. Without it, I would have been adding and removing console.log statements for 20 minutes trying to understand the render behavior.
Labeled Counters for Multiple Tracking Points
Pass a string label to track different counters independently.
function handleEvent(event) {
    console.count(event.type);
}

// After user interaction:
// click: 1
// click: 2
// mousemove: 1
// mousemove: 2
// mousemove: 3
// scroll: 1
Now you can see exactly how many of each event type fires. If scroll events fire 200 times during a 2-second scroll, you know you need to add throttling. If click fires twice on a single button press, you have an event bubbling issue.
Reset counters with console.countReset('click') when you want to start counting from zero again, for example at the start of each new user interaction flow or when navigating to a new page in a single-page application.
console.warn and console.error for Structured Severity Levels
Most developers use console.log for everything. But console.warn and console.error exist for a reason: they add visual severity levels and allow filtering in browser DevTools.
// Instead of this
console.log('WARNING: API rate limit approaching');
console.log('ERROR: Payment processing failed');

// Do this
console.warn('API rate limit approaching', { currentUsage: 450, limit: 500 });
console.error('Payment processing failed', { orderId: '123', error: err.message });
console.warn shows with a yellow background and warning icon. console.error shows with a red background, error icon, and a stack trace that shows where the error was logged from. In DevTools, you can filter to show only warnings, only errors, or only info-level logs. When your console has 200 lines of output from various parts of the application, filtering by severity makes the critical information visible instantly instead of buried in noise.
The filtering ability alone makes severity levels worth using. During a debugging session where you have timing logs, data inspection logs, and actual error logs all mixed together, clicking the "Errors" filter in DevTools shows only the red error lines. This is not possible when everything uses console.log because all output has the same severity level and cannot be filtered.
In production Node.js applications, console.warn and console.error write to stderr while console.log writes to stdout. This means your deployment platform (Vercel, AWS, Docker) can separate normal output from warnings and errors in log aggregation tools like Datadog or CloudWatch. Using severity levels correctly turns your console output into structured, searchable production logs.
For developers building production error handling systems, proper severity levels in console output are the first step toward production-grade observability.
console.profile and console.profileEnd for CPU Profiling in the Browser
console.profile starts the JavaScript CPU profiler in the browser. console.profileEnd stops it and opens the profiling results in the Performance tab.
function processLargeDataset(data) {
    console.profile('data-processing');

    const filtered = data.filter(item => item.active);
    const sorted = filtered.sort((a, b) => b.score - a.score);
    const transformed = sorted.map(item => transformItem(item));

    console.profileEnd('data-processing');
    return transformed;
}
The profile shows exactly how much CPU time each function consumes: filter took 12ms, sort took 45ms, map took 8ms. You can see which function is the bottleneck without guessing. This is more precise than console.time because it breaks down the time by function call, not just start-to-finish.
Use console.profile when console.time tells you something is slow but does not tell you which part. Time gives you the total. Profile gives you the breakdown.
console.clear for Resetting Your Debugging Session
This sounds trivial but most developers never use console.clear() programmatically. They clear the console manually in DevTools or just let logs pile up until they cannot find anything. Placing console.clear() at the start of a function you are debugging gives you a clean slate every time the function executes.
function debugCheckoutFlow(cart) {
    console.clear(); // Fresh start every time
    console.group('Checkout Debug Session');
    console.log('Cart items:', cart.items.length);
    console.time('checkout');
    // ... rest of debugging
}
Every time debugCheckoutFlow runs, the console clears and you see only the output from the current execution. No more scrolling past output from 15 previous executions trying to find the current one. When you are debugging a function that runs on every keystroke or every scroll event, console.clear() is the difference between useful output and an unreadable wall of text.
In Node.js you can use console.clear() to reset the terminal output during development. This is useful when running a file watcher that re-executes your code on every save. Each save clears the terminal and shows fresh output.
The Complete Debugging Workflow Using Console Methods Together
Individual console methods are useful. Combined into a workflow, they become a debugging system that rivals dedicated profiling tools. Here is the workflow I use when investigating a bug or performance issue.
Step 1 and Isolate the Problem Area With console.group
Start by wrapping the suspected problem area in a group. This creates a named, collapsible section in the console that separates your debugging output from everything else the application logs.
function suspectedProblem(input) {
    console.group('BUG INVESTIGATION: suspectedProblem');
    console.log('Input received:', input);
    // ... investigation code
    console.groupEnd();
}
Step 2 and Verify Your Assumptions With console.assert
Before diving into the logic, check your assumptions about the input data. Wrong assumptions about data shape or content are the source of most bugs.
function processUserOrder(user, order) {
    console.group(`Order Processing: ${order.id}`);

    console.assert(user !== null, 'User is null');
    console.assert(user !== undefined, 'User is undefined');
    console.assert(order.items.length > 0, 'Order has no items', order);
    console.assert(typeof order.total === 'number', 'Total is not a number', {
        total: order.total,
        type: typeof order.total,
    });
    // If no assertions fire, your assumptions are correct
    // If one fires, you found the bug immediately
}
Step 3 and Measure Each Phase With console.time
Once you know where the problem is, measure each step to find what is slow or what is executing unexpectedly.
    console.time('validate');
    const isValid = validateOrder(order);
    console.timeEnd('validate');

    console.time('calculate');
    const total = calculateTotal(order);
    console.timeEnd('calculate');

    console.time('save');
    await saveOrder(order);
    console.timeEnd('save');
Step 4 and Inspect the Data With console.table
When you find the step that is wrong, inspect the data flowing through it.
    console.table(order.items, ['name', 'price', 'quantity', 'subtotal']);
    console.log('Calculated total:', total);
    console.log('Expected total:', order.expectedTotal);
    console.assert(
        Math.abs(total - order.expectedTotal) < 0.01,
        'Total mismatch',
        { calculated: total, expected: order.expectedTotal, difference: total - order.expectedTotal }
    );

    console.groupEnd();
This four-step workflow finds most bugs in 5-10 minutes. Group to isolate, assert to verify assumptions, time to measure, table to inspect. Each step narrows the search space. By step 4, you usually know exactly what is wrong and why.
Node.js Specific Console Methods and Patterns
Node.js has the same console methods as browsers plus some additional formatting options that are useful for backend debugging.
Formatted Output With util.inspect
When console.log truncates deep objects with [Object], use util.inspect for full control over output formatting.
const util = require('util');

const complexResponse = await externalApi.fetchData();

// Default console.log truncates nested objects
console.log(complexResponse); // { data: { users: [Object] } }

// util.inspect shows everything
console.log(util.inspect(complexResponse, {
    depth: null,      // show all levels
    colors: true,     // syntax coloring in terminal
    maxArrayLength: null,  // show all array items
    maxStringLength: null, // show full strings
}));
Conditional Logging for Development vs Production
In Node.js, create a debug logger that only outputs during development. This lets you leave debugging code in your source files without it affecting production.
const debug = process.env.NODE_ENV === 'development'
    ? console.log.bind(console)
    : () => {};

const debugTable = process.env.NODE_ENV === 'development'
    ? console.table.bind(console)
    : () => {};

// These only output during development
debug('Processing request:', req.url);
debugTable(queryResults, ['id', 'name', 'status']);
This pattern is especially useful for database query debugging. You want to see the actual query results during development but absolutely do not want them logged in production where they might contain sensitive user data.
Colorized Console Output in Node.js
Node.js supports ANSI color codes in console output. Use them to make different types of information visually distinct in the terminal.
const colors = {
    red: '\x1b[31m',
    green: '\x1b[32m',
    yellow: '\x1b[33m',
    blue: '\x1b[34m',
    reset: '\x1b[0m',
};

function debugLog(label, message, data) {
    const timestamp = new Date().toISOString().split('T')[1].slice(0, 12);
    console.log(
        `${colors.blue}[${timestamp}]${colors.reset} ${colors.yellow}${label}${colors.reset}: ${message}`,
        data || ''
    );
}

debugLog('DB', 'Query executed', { table: 'users', rows: 42, ms: 12 });
debugLog('AUTH', 'Token validated', { userId: 'abc123' });
debugLog('CACHE', 'Cache miss', { key: 'user:abc123' });
Each log line has a timestamp, a colored label showing the subsystem, and the actual message with data. When scrolling through terminal output, you can instantly spot database logs (blue DB label), auth logs (yellow AUTH label), and cache logs without reading every line.
Common Console Debugging Mistakes That Waste Time
Mistake 1 and Logging Objects Before They Change
JavaScript logs object references, not snapshots. If you log an object and then modify it, the console shows the modified version, not the version at the time of logging.
const user = { name: 'Alice', score: 10 };
console.log(user);       // Shows: { name: 'Alice', score: 100 } (!!)
user.score = 100;
// The console shows score: 100 even though you logged BEFORE the change
The fix is to clone the object at the time of logging.
console.log(JSON.parse(JSON.stringify(user)));  // snapshot, not reference
// Or
console.log({ ...user });  // shallow clone
// Or
console.log(structuredClone(user));  // deep clone (modern browsers + Node 17+)
This is one of the most confusing console behaviors and it causes developers to spend hours debugging "impossible" states where the logged value does not match what the code should have produced. The code was correct. The console just showed the wrong value because it was displaying the live reference, not a point-in-time snapshot.
Mistake 2 and Forgetting That console.log Is Asynchronous in Node.js
In Node.js, console.log writes to stdout which is asynchronous. If your process exits immediately after a console.log, the output might not appear.
console.log('About to exit');
process.exit(1);
// The log might not appear because stdout was not flushed
This bites developers who add logging to diagnose crashes. The crash happens, the process exits, and the log that would have explained the crash is lost because it was still in the stdout buffer. Use process.stdout.write with a callback or delay the exit to ensure output is flushed.
Mistake 3 and Using console.log Inside Loops Without Limits
// This will print 10,000 lines and freeze your DevTools
data.forEach(item => {
    console.log('Processing:', item);
});

// Better: log only the first few and the total count
console.log('Processing', data.length, 'items. First 3:', data.slice(0, 3));
Logging inside tight loops can freeze the browser DevTools, crash the terminal with output, and make the actual useful logs impossible to find. Always limit loop logging to a sample or use console.count to just count iterations without printing each one.
How to Combine Console Methods for Production-Grade Debugging
The real power of console methods appears when you combine them. Here is a debugging pattern I use when investigating performance issues in production-like environments.
async function debugApiEndpoint(req, res) {
    console.group(`${req.method} ${req.url}`);
    console.time('total-request');

    console.time('auth');
    const user = await authenticate(req);
    console.timeEnd('auth');
    console.assert(user !== null, 'Authentication returned null', { headers: req.headers });

    console.time('query');
    const data = await db.jobs.findMany({ where: { active: true } });
    console.timeEnd('query');
    console.table(data.slice(0, 5), ['id', 'title', 'salary', 'createdAt']);
    console.log(`Total results: ${data.length}`);

    console.time('transform');
    const response = data.map(transformJob);
    console.timeEnd('transform');

    console.timeEnd('total-request');
    console.groupEnd();

    res.json(response);
}
The output is a collapsible group named "GET /api/jobs" containing timing for each phase, a table preview of the first 5 results, assertions that verify assumptions, and a total request time. You can see at a glance that authentication took 5ms, the database query took 180ms, and the transformation took 3ms. The table shows you the actual data so you can verify the query returned the correct results.
Compare this to 8 scattered console.log statements with no grouping, no timing, no structure, and no table formatting. The structured version takes the same time to write but saves minutes of scrolling and interpreting output every time you look at it.
The Console Methods to Avoid in Production Code
All console methods should be removed from production frontend code. They clutter the browser console for end users who happen to open DevTools, they expose internal data structures and variable names that could be a security risk if an attacker inspects the console, and they add a small but real performance overhead from serializing objects and writing to the console output stream. On mobile browsers, excessive console output can noticeably slow down the application because mobile devices have less memory and CPU available for non-essential operations.
Use ESLint's no-console rule to catch accidental console statements before they reach production.
// .eslintrc.js
module.exports = {
    rules: {
        'no-console': ['warn', { allow: ['warn', 'error'] }],
    },
};
This configuration warns on console.log, console.table, console.time, console.group, and all other debug methods while allowing console.warn and console.error which have legitimate production use for logging real warnings and errors that monitoring tools should capture. The warning level (instead of error) means it does not block your build during development but reminds you to remove debug logs before merging.
For Node.js backend code, replace console methods with a proper structured logging library like Pino or Winston in production environments. Pino outputs JSON-formatted logs that integrate with log aggregation services like Datadog, Grafana Loki, and AWS CloudWatch. Keep console methods for local development where their formatting benefits, especially console.table and console.group, are most useful and where the output goes only to your terminal.
The developers who debug fastest are not the ones who type the most console.log statements. They are the ones who use the right console method for each specific situation. console.table for visual data inspection when you need to see patterns in arrays of objects. console.group for organized output when debugging multi-step processes. console.time for performance measurement when you need to find the slow part. console.trace for call stack investigation when you need to know who called a function and why. console.assert for assumption verification when you suspect bad data is flowing through the system. console.count for execution frequency tracking when you suspect something runs more times than it should. console.dir for deep object inspection when console.log truncates the data you need to see. console.warn and console.error for severity-based filtering when your console is overwhelmed with output.
Each method exists because console.log alone is not enough for professional debugging, and the developers who discover this early in their careers debug in 10 minutes what others debug in 3 hours. The senior developer from the opening of this article spent 3 hours with 47 console.log statements. Three of the methods in this article, console.time, console.table, and console.group, would have solved his problem in a single debugging session of under 10 minutes. The tools were always there. He just never learned to use them.
Learning these methods takes an afternoon of practice. The time savings compound over years. Every debugging session from this point forward becomes faster, more structured, and less frustrating. That is not a small improvement. That is a career-long advantage that shows up in your speed, your code quality, and your ability to handle production incidents that would paralyze developers who only know console.log.
If you want to see which JavaScript companies value strong debugging skills and what senior debugging-capable developers earn, I track this data weekly at jsgurujobs.com.
FAQ
What is the most useful console method besides console.log?
console.table is the most immediately useful method for most developers. It transforms arrays of objects from collapsed, unreadable JSON into formatted, sortable tables. The first time you use it to debug a list of API results or database records, you will never go back to console.log for data inspection.
Should I remove all console statements from production code?
Remove all debug methods (console.log, console.table, console.time, console.group) from production frontend code. Keep console.warn and console.error as they serve legitimate purposes for logging warnings and errors. Use ESLint's no-console rule to catch debug statements automatically before they reach production.
Can I use console.time to profile production performance?
console.time is great for local debugging but should not be left in production code. For production performance monitoring, use proper Application Performance Monitoring (APM) tools like Datadog, New Relic, or the Web Performance API (performance.mark and performance.measure) which provide the same timing data without console output.
How do I debug React re-renders with console methods?
Use console.count inside the component body to see how many times it renders. If the count exceeds expectations, use console.trace to see which parent component or state change triggers each re-render. Combine with console.time around expensive render logic to measure the performance impact of each unnecessary re-render.
Share this article